
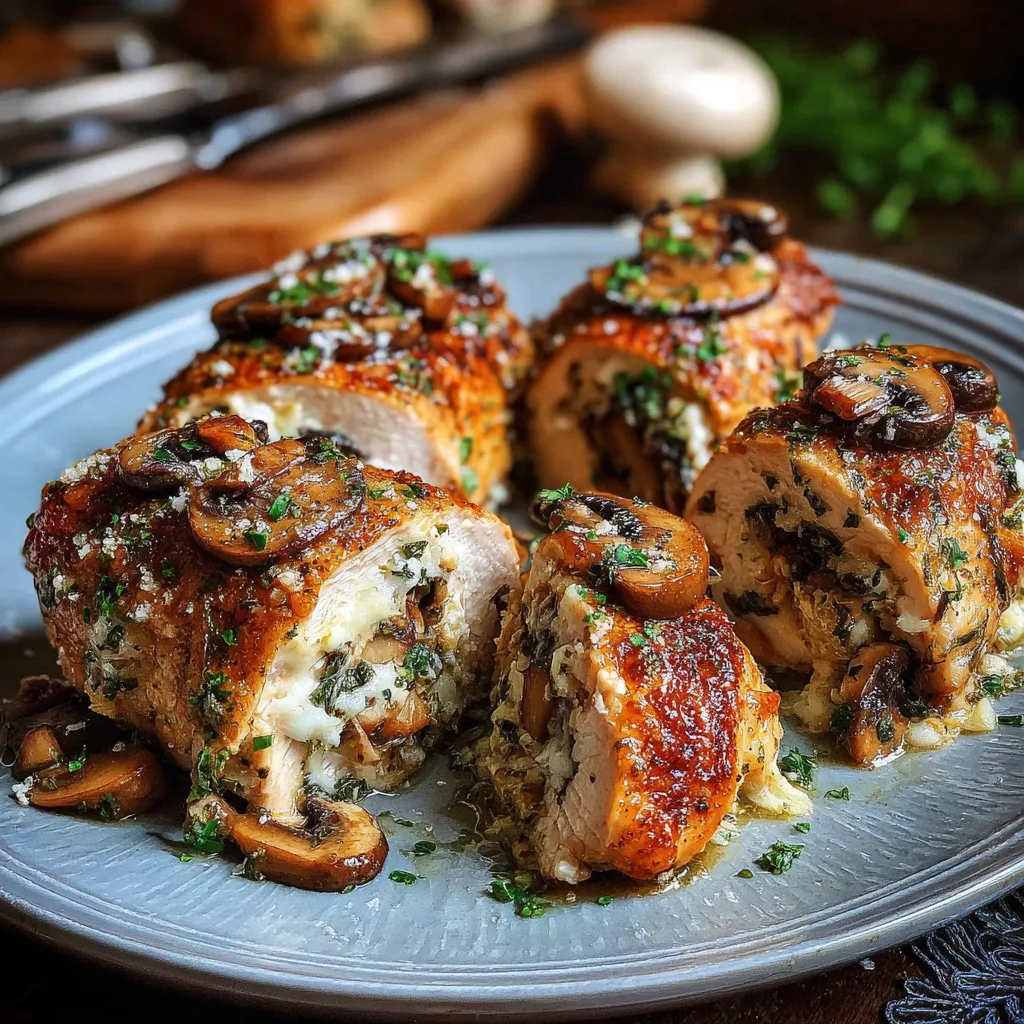
Cheesy Garlic Butter Mushroom Stuffed Chicken delivers juicy chicken breasts wrapped around a creamy cheese and mushroom filling, sizzling in garlic butter and oven-roasted to a golden, mouthwatering finish. This recipe tucks a savory blend of sautéed mushrooms, garlic, and mozzarella into chicken pockets before searing in olive oil and baking until the cheese is melty and the chicken is perfectly cooked. Ready in under an hour, it’s an impressive yet approachable dish that’s sure to become a family favorite—let’s dive in!
Key Ingredients
Gather these simple ingredients to build layers of flavor in your Cheesy Garlic Butter Mushroom Stuffed Chicken:
- 4 chicken breasts: Hearty protein base that holds the cheesy mushroom filling and stays juicy after baking.
- 1 cup finely chopped mushrooms: Earthy bites that soak up garlic butter and add depth to each pocket.
- 2 cloves minced garlic: Pungent aromatics that bring bright, savory notes to the filling.
- 2 tablespoons melted butter: Rich fat for sautéing and infusing the mushrooms with buttery goodness.
- 1 cup shredded mozzarella cheese: Creamy, gooey binder that melts into the mushrooms for irresistible stretch.
- 1 tablespoon chopped fresh parsley: Fresh herb that adds a pop of color and light herbal flavor.
- 1 teaspoon dried thyme: Subtle woodsy undertones that complement the mushrooms and chicken.
- Salt to taste: Essential seasoning that enhances every ingredient.
- Pepper to taste: A touch of heat that balances the richness.
- 2 tablespoons olive oil: High-heat oil for searing the chicken to a beautiful golden crust.
How To Make Cheesy Garlic Butter Mushroom Stuffed Chicken
Bringing this recipe together involves a few key techniques: sautéing the filling, making a pocket in each breast, browning for color, and finishing in the oven for perfect doneness. Follow these steps closely to ensure each bite is packed with melty cheese, tender chicken, and garlicky mushroom flavor.
1. Preheat the oven to 375°F (190°C). Position the rack in the center for even heat distribution.
2. In a skillet over medium heat, melt the butter and sauté the mushrooms and garlic until the mushrooms release moisture and turn tender, about 4–5 minutes.
3. Remove the pan from heat and stir in the shredded mozzarella, chopped parsley, dried thyme, salt, and pepper until the cheese just starts to melt.
4. Using a sharp knife, cut a pocket into each chicken breast—slice carefully to avoid cutting through completely. Stuff each breast generously with the mushroom-cheese mixture and secure with toothpicks if needed.
5. Heat the olive oil in an ovenproof skillet over medium-high heat. Add the stuffed breasts and sear for 3–4 minutes per side, creating a golden-brown crust.
6. Transfer the skillet to the preheated oven and bake for 20–25 minutes, or until a meat thermometer inserted into the center reads 165°F (74°C).
7. Remove the skillet from the oven and let the chicken rest for 5 minutes—this helps the juices redistribute. Carefully remove toothpicks before serving.
Serving Suggestions
This Cheesy Garlic Butter Mushroom Stuffed Chicken stands beautifully on its own, but pairing it with the right sides can lift it to restaurant quality. Think bright greens, creamy comforts, or crusty breads to balance the rich filling and golden chicken.
- Serve over a bed of creamy mashed potatoes to soak up every bit of garlic butter and melted cheese.
- Pair with steamed broccoli or green beans for a fresh, crisp contrast and vibrant color.
- Drizzle a simple lemon-herb pan sauce made by deglazing the skillet with white wine and fresh herbs for a tangy finish.
- Add a side of buttery garlic bread to make the meal extra cozy and to sop up any leftover delicious filling.
Tips For Perfect Cheesy Garlic Butter Mushroom Stuffed Chicken
Ready to nail this dish every time? These friendly pointers will keep your filling flavorful, the chicken tender, and cleanup easy—no stress, all reward.
- Prepare the mushroom filling a day ahead to save hands-on time on cooking day and allow flavors to meld.
- Use a meat thermometer to ensure the chicken reaches an internal temperature of 165°F (74°C) for perfectly cooked, safe poultry.
- Swap the mozzarella for cheddar, Swiss, or gruyère to tailor the gooey filling to your taste preferences.
- Store any leftovers in an airtight container in the refrigerator for up to 3 days, then reheat gently to maintain juiciness.
How To Store It
Whether you’re planning meals or tucking away leftovers, storing this stuffed chicken properly keeps each bite as delicious as day one. Use these methods to maintain its cheesy, flavorful goodness.
- Refrigeration: Cool the chicken to room temperature, then transfer to an airtight container and refrigerate for up to 3 days.
- Freezing: Place cooled, uncooked stuffed breasts on a baking sheet until solid, then transfer to freezer bags for up to 2 months.
- Reheating in the oven: Preheat to 350°F (175°C), arrange slices in a baking dish, cover with foil, and heat for 10–12 minutes until warmed through.
- Microwave: For a quick fix, microwave on medium power in 1-minute increments, covering with a damp paper towel to retain moisture.
Frequently Asked Questions
Got questions about this recipe? Check out these quick answers below!
- Q: How long does it take to prepare and cook this recipe?
A: Prep time is about 10–15 minutes for chopping and stuffing, browning takes 6–8 minutes, oven baking requires 20–25 minutes, and resting adds 5 minutes, for a total of roughly 45–50 minutes.
- Q: How can I be sure the chicken is fully cooked without overcooking?
A: Use a meat thermometer inserted into the thickest part of the chicken, ensuring it reads 165°F (74°C). If you don’t have a thermometer, cut into the center to check that the juices run clear and the meat is opaque with no pink.
- Q: Can I make the mushroom filling in advance?
A: Yes, you can prepare the sautéed mushroom and cheese filling up to one day ahead. Store it in an airtight container in the refrigerator and stuff the chicken just before cooking to maintain maximum freshness.
- Q: What variations can I try with the cheese or herbs?
A: Substitute mozzarella with cheddar, Swiss, gruyère, or goat cheese for different flavors. Fresh herbs like basil, oregano, or rosemary can replace or complement the parsley and thyme for a customized taste.
- Q: How should I brown the chicken to get a crisp exterior?
A: Preheat an ovenproof skillet over medium-high heat, add olive oil, and sear each stuffed breast for 3–4 minutes per side without moving them. This creates a golden-brown crust before transferring to the oven.
- Q: Is it necessary to use toothpicks, and how do I remove them safely?
A: Toothpicks help secure the filling and prevent it from spilling during cooking. After the 5-minute rest, carefully remove them with tongs or a fork before serving to avoid any accidents.
- Q: How should I store and reheat leftovers?
A: Store leftovers in an airtight container in the refrigerator for up to 3 days. To reheat, place in a preheated 350°F (175°C) oven for 10–12 minutes or microwave on medium power for 1–2 minutes, checking for even heating.
- Q: Can I freeze the stuffed chicken, and what’s the best way to reheat from frozen?
A: Yes, freeze uncooked stuffed chicken on a baking sheet until solid, then transfer to a freezer bag for up to 2 months. Bake from frozen at 375°F (190°C) for 30–35 minutes, then verify the internal temperature reaches 165°F (74°C).
What Makes This Special
This Cheesy Garlic Butter Mushroom Stuffed Chicken combines simple, pantry-friendly ingredients with fuss-free techniques to deliver a crowd-pleasing, flavor-packed meal. The juicy chicken, oozy cheese, and savory mushrooms wrapped in garlic butter come together to create a dish that’s equal parts comfort and showstopper. Feel free to print this recipe, save it for later, and mix up the cheeses or herbs next time you’re craving something delicious. If you give it a go, drop a comment below or share your culinary triumphs—I can’t wait to hear how your kitchen adventure unfolds!
Print
Cheesy Garlic Butter Mushroom Stuffed Chicken
- Prep Time: 20 mins
- Cook Time: 30 mins
- Total Time: 50 minutes
- Yield: 4 servings
- Category: Main Dishes
Description
This recipe tucks a savory blend of sautéed mushrooms, garlic, and mozzarella into chicken pockets before searing in olive oil and baking until the cheese is melty and the chicken is golden.
Ingredients
- 4 chicken breasts
- 1 cup finely chopped mushrooms
- 2 cloves minced garlic
- 2 tablespoons melted butter
- 1 cup shredded mozzarella cheese
- 1 tablespoon chopped fresh parsley
- 1 teaspoon dried thyme
- Salt to taste
- Pepper to taste
- 2 tablespoons olive oil
Instructions
- Preheat the oven to 375°F (190°C).
- In a skillet over medium heat melt the butter and sauté the mushrooms and garlic until tender.
- Remove from heat and stir in the mozzarella cheese, parsley, thyme, salt, and pepper.
- Cut a pocket into each chicken breast and stuff with the mushroom and cheese mixture, securing with toothpicks if necessary.
- Heat olive oil in an ovenproof skillet over medium-high heat and brown the chicken on both sides.
- Transfer the skillet to the preheated oven and bake for 20 to 25 minutes or until the chicken reaches an internal temperature of 165°F (74°C).
- Remove from the oven, let rest for 5 minutes, then remove toothpicks and serve.
Notes
- You can prepare the mushroom filling a day ahead to save time.
- Ensure the chicken is fully cooked by checking the internal temperature.
- Substitute mozzarella with cheddar or Swiss cheese for different flavors.
- Leftovers can be stored in the refrigerator for up to 3 days.