
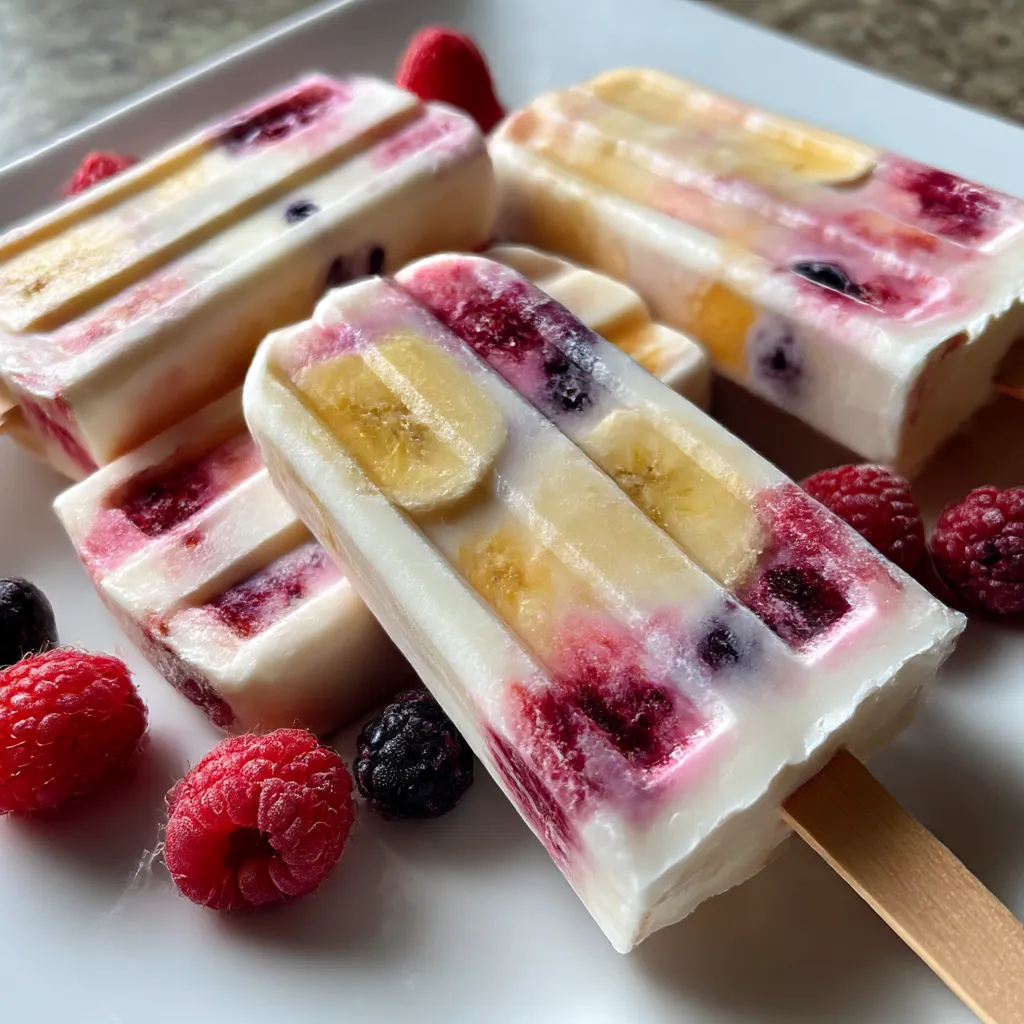
There’s something magical about Fruity Yogurt Pops: swirled yogurt and vibrant fruit layers freeze into colorful pops that brighten any summer day. Creamy Greek yogurt melds with honeyed vanilla, then cascades into pureed berries and banana, creating that cool, tangy-sweet melt bursting with real fruit goodness. Give your freezer a makeover with this easy, no-fuss dessert that any beginner can whip up. Ready to chase the heat away? Keep reading!
Key Ingredients
Let’s check out the star players that make these Fruity Yogurt Pops so irresistible:
- 2 cups plain Greek yogurt: Creamy base that gives pops their rich texture and tangy flavor.
- 3 tablespoons honey: Natural sweetener that balances tartness and adds a smooth finish.
- 1 teaspoon vanilla extract: Fragrant flavor booster that enhances the yogurt’s creaminess.
- 1 cup mixed berries: Vibrant fruit blend for bright color and juicy bursts in every bite.
- 1 ripe banana: Adds natural sweetness and helps thicken the fruit layer.
- ½ cup orange juice: Liquid base for the puree, ensuring a smooth, pourable consistency.
How To Make Fruity Yogurt Pops
From whipping up your creamy yogurt base to layering luscious fruit puree, this section walks you through every step. You’ll learn how to blend, layer, and freeze for pops that look as good as they taste. Gather your bowls, blender, and molds—then let’s transform simple ingredients into a summertime treat that’s fun for the whole family!
1. In a large mixing bowl, combine 2 cups plain Greek yogurt, 3 tablespoons honey, and 1 teaspoon vanilla extract. Use a whisk or spoon to stir until the mixture is completely smooth and all ingredients are well incorporated.
2. Place 1 cup mixed berries, 1 ripe banana, and ½ cup orange juice into a blender. Puree until you achieve a silky-smooth fruit mixture, stopping to scrape down the sides as needed.
3. Spoon a generous layer of the yogurt mixture into each popsicle mold, filling about one-third of the way. This creates a sturdy bottom layer.
4. Pour a layer of the vibrant fruit puree over the yogurt, then use the back of a spoon to level it out. Alternate between yogurt and fruit layers until your molds are nearly full.
5. Insert popsicle sticks into each mold, ensuring they stand upright. Place the filled molds in the freezer and freeze for at least 4 hours or until completely solid.
6. To unmold, briefly run warm water over the exterior of the popsicle molds for about 15–20 seconds. Gently pull the sticks straight up to release each pop without breaking.
Serving Suggestions
These Fruity Yogurt Pops are not only a treat for your taste buds but also a visual delight. Whether you’re hosting a backyard party or enjoying a solo snack, here are some fun ways to elevate your presentation:
- Serve as a healthy dessert after a BBQ: plate with fresh berry garnishes and a drizzle of honey.
- Arrange on a wooden platter lined with mint leaves to create an elegant summer display.
- Pair with a sparkling citrus mocktail for a refreshing palate cleanser between bites.
- Pack a few pops in an insulated cooler for beach days or picnics to keep them perfectly chilled.
Tips For Perfect Fruity Yogurt Pops
These helpful pointers will take your pops from great to unforgettable. Keep them in mind for flawless layering, texture, and flavor every time you make this recipe:
- Use full-fat Greek yogurt for a creamier texture that holds up well to freezing.
- Substitute maple syrup for honey to make them vegan-friendly without sacrificing sweetness.
- Experiment with different fruits like mango or peaches to create seasonal variations.
- For a marbled effect, gently swirl yogurt and puree layers with a skewer—stop once you see pretty ribbons.
How To Store It
Once your pops are perfectly set, proper storage will keep them tasting fresh and vibrant. Follow these tips to maintain their creamy texture and fruity zing:
- Keep pops in their molds: cover with plastic wrap or a lid to prevent freezer burn.
- Transfer fully frozen pops to an airtight freezer-safe container or resealable bag.
- Label with the date and store at 0°F (–18°C) to maintain optimal texture.
- Avoid placing them near strong-smelling foods to prevent absorbing unwanted odors.
Frequently Asked Questions
Here are some quick answers to the most common questions about Fruity Yogurt Pops:
- Q: How long does it take to prepare and freeze these Fruity Yogurt Pops?
A: The active prep time is about 10–15 minutes (mixing and blending), plus at least 4 hours of freezing, for a total of around 4 hours and 15 minutes.
- Q: Can I use a different type of yogurt or non-dairy alternative?
A: Yes. Full-fat plain Greek yogurt gives the creamiest texture, but you can swap in low-fat Greek yogurt or a plant-based coconut or almond yogurt. Non-dairy options may be slightly softer when frozen.
- Q: What’s the easiest way to achieve a marbled effect in my popsicles?
A: After layering, insert a wooden skewer or toothpick into each mold and gently swirl up and down until you see distinct ribbons of yogurt and fruit.
- Q: How do I unmold the popsicles without breaking them?
A: Run warm (not hot) tap water over the outside of the molds for 15–20 seconds, rotating to warm evenly. Firmly grasp the stick and pull straight up; repeat if it resists.
- Q: Can I make these popsicles vegan or refined-sugar-free?
A: Yes. Replace the Greek yogurt with plant-based yogurt and swap honey for maple syrup or agave nectar.
- Q: Are there any recommended fruit variations or additions?
A: Try mango with lime juice, peaches with ginger, or pineapple with mint. You can also stir in small fruit chunks for extra texture.
- Q: How should I store the popsicles and how long will they stay good?
A: Store in molds or an airtight container at 0°F (–18°C). They’ll stay optimally fresh for up to 2 months.
- Q: My fruit puree seems too thick or too thin—how can I adjust the consistency?
A: If too thick, add orange juice one tablespoon at a time until pourable. If too thin, reduce juice or add extra fruit to thicken.
What Makes This Special
Fruity Yogurt Pops are the ultimate cool-down companion on a hot day—you get swirls of tangy-sweet yogurt layered with real fruit puree all in one fun bite. What really sets them apart is the balance of creamy and fresh flavors, plus the DIY marbled look that’ll make your kids (and you!) feel like a pro. Don’t forget to print out this article and save it for your next summer gathering. If you give these pops a whirl, drop a comment below or share any questions—you’ll have your coolest fan club ready to cheer you on!
Print
Fruity Yogurt Pops
- Prep Time: 15 mins
- Total Time: 15 minutes
- Yield: 6 servings
- Category: Desserts
Description
Creamy Greek yogurt melds with honeyed vanilla, then cascades into pureed berries and banana. Each bite offers a cool, tangy-sweet melt with bursts of real fruit flavor and a delightfully creamy finish.
Ingredients
- 2 cups plain Greek yogurt
- 3 tablespoons honey
- 1 teaspoon vanilla extract
- 1 cup mixed berries
- 1 ripe banana
- ½ cup orange juice
Instructions
- In a bowl combine Greek yogurt, honey, and vanilla extract until smooth.
- In a blender puree mixed berries and banana with orange juice until well blended.
- Spoon a layer of yogurt mixture into each popsicle mold.
- Add a layer of fruit puree over the yogurt, then alternate layers until molds are full.
- Insert popsicle sticks and freeze for at least 4 hours or until solid.
- To unmold, briefly run warm water over the outside of the molds and gently pull pops off.
Notes
- Use full-fat Greek yogurt for creamier texture.
- Substitute maple syrup for honey to make them vegan.
- Experiment with different fruits like mango or peaches for variety.
- For a marbled effect, gently swirl yogurt and puree layers with a skewer.